

Getting your base setup properly is crucial to ensuring that your RTK data is correct. Some of the most common problems I see at the support desk are related to how surveyors set their RTK base stations up. I find that the majority of these errors stem from a misunderstanding of how base stations work, and what is actually happening when you tell your base to begin broadcasting its position. To know what the best base setup is for you, we need to take a look at the different setup modes, how they work and what you need to consider.
How Does a Base Actually Work?
What Are Your Base Setup Options? – Known or Average
How Does an Average Position Setup Work?
Why Average Position Is Better (Most of the Time)
How Do You Correct for the Error in an Average Position Setup?
What About the Second Day Setup?
Final Thoughts
Before we talk about what your best base setup is, it is important to understand how a RTK base station works. Your base station, after setting over a point, no matter the setup you use, will do the exact same thing. In the software, when you set a position, you are telling the base to assume those coordinates. In doing so, the base can then observe the satellite corrections and information for that position. The base station then transmits this correction data in real-time to your rover. These corrections allow the rover to correct for errors caused by factors like atmospheric interference, clock drift and more.
In short, your base takes an assumed coordinate, and shouts out to the world where it is and what it sees at that location.
With that in mind, there are two ways to set up your base station, either on a point with known coordinates or a point with unknown coordinates. The only difference is the source of the coordinates your base will be set over.
Both setup procedures will give a centimeter level accurate position at the rover. However, even if set over the exact same point, the two different methods can give drastically different results. To understand why your results will be fundamentally different, we need to understand how the average position setup works.
Here’s how the two methods stack up side by side:
| Known Position | Average Position | |
| Accuracy | Centimeter-level absolute accuracy, tied to real-world coordinates | Centimeter-level relative accuracy, but can carry an absolute offset of meters |
| Repeatability | Consistent day to day, since the same coordinates are reused | Not consistent between setups without a localization |
| Flexibility | Limited to available control points, which may be obstructed | Can be placed wherever signal conditions are best |
| Ideal Applications | Multi-day projects, work that must align with existing control | Single-day surveys, sites with few or poorly placed control points |
| Advantages | Data aligns precisely with real-world coordinates and previous surveys | Preserves control points for rover use, more freedom in base placement |
| Limitations | Uses up a control point, requires a full re-setup if the point is bad | Introduces a position bias that must be corrected with a localization |
Understanding these tradeoffs upfront makes it much easier to pick the right setup before you’re already in the field.
A known position setup is relatively straight forward to understand. You place the receiver over a point on the ground with set of coordinates that you know. Average position setups are used when that point on the ground does not have a known set of coordinates. As a consequence, you can end up with an offset in your data. Later on I will go over how this can be corrected, but first let us explore why that is the case.
When performing an average position setup, you are doing exactly as it sounds, you are averaging a position on the ground. Your receiver is effectively performing an educated guess of where it is on the Earth. Unfortunately, on its own, GNSS is not a perfectly accurate solution. The military has degraded the position for civilian use (You can read more about the history of GPS here: GPS In Surveying – From Weapon of War to Everyday Tool). As a consequence, if you were to record a single position of your base and use it to set the base coordinates, you could be up to 0.5 – 5 m from where the base really is.
To attempt to obtain a more accurate position, we can average several of these positions together. I actually took a look at this in my video on averaging points, which you can read more about here: What is the Right Number of Averaged Observations in RTK Surveying.
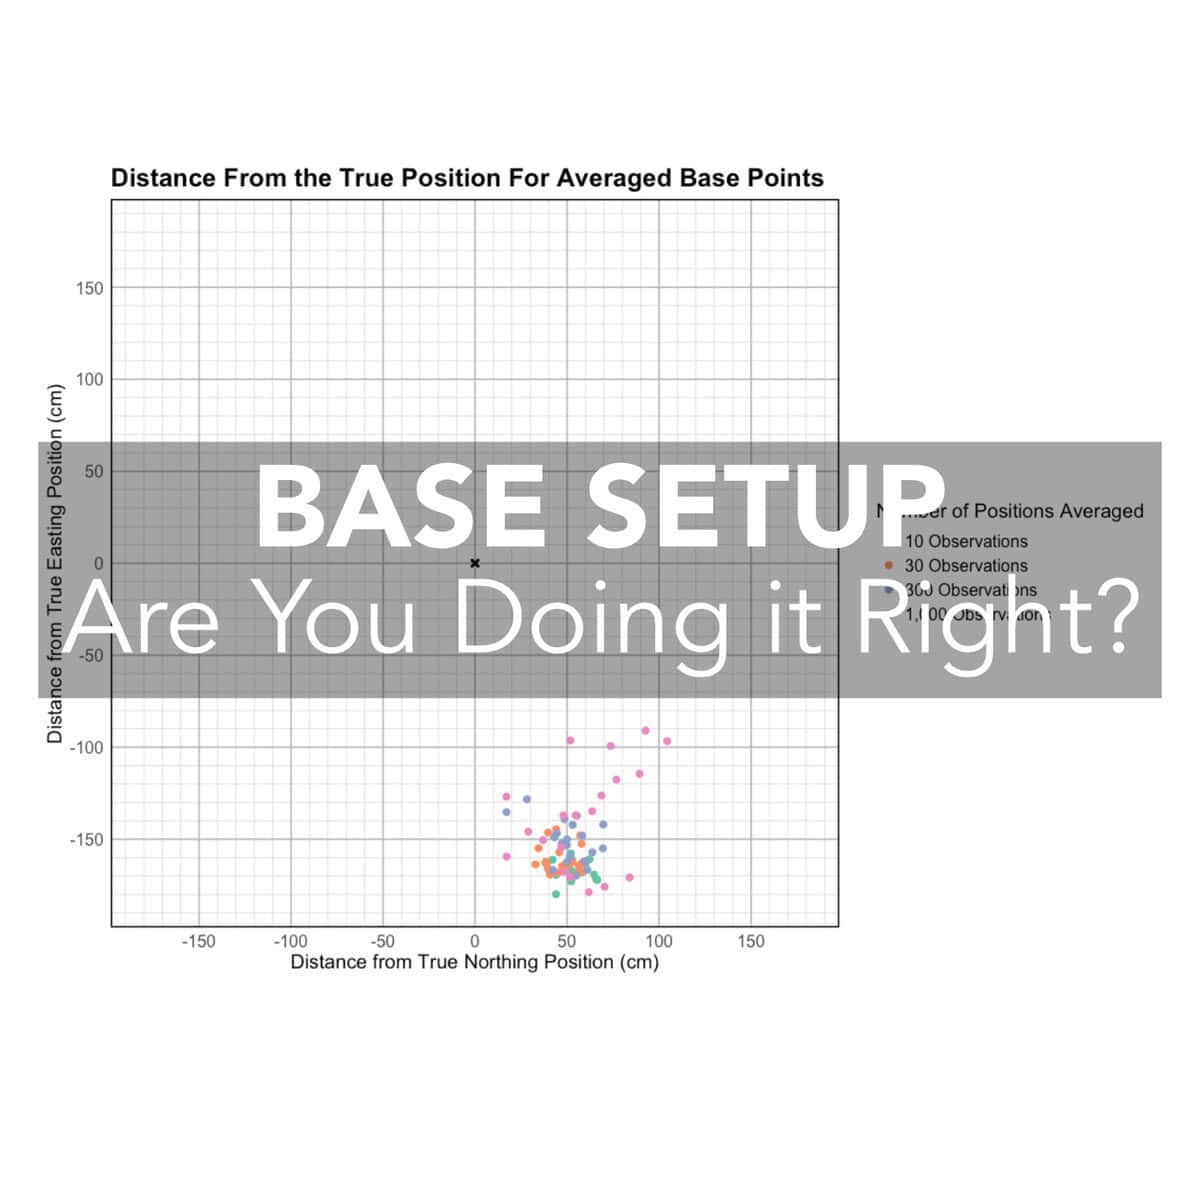
Now the catch with this is, you do not know when you have reached an average position that is perfectly centered on the real-world coordinate. To illustrate this, we went ahead and tested the precision of an averaged base setup with 10, 30, 300 and 1,000 observations averaged together and compared the resulting coordinate to a post processed “known coordinate”. We repeated each shot a number of times to see what the average error was.
| Observations | Mean Error N (cm) | Mean Error E (cm) | Mean Error H (cm) |
| 10 | 53.98 ± 7.81 | 167.82 ± 5.44 | 90.80 ± 41.05 |
| 30 | 47.48 ± 8.35 | 161.59 ± 7.62 | 95.45 ± 41.36 |
| 300 | 51.38 ± 12.56 | 151.91 ± 11.48 | 62.80 ± 42.31 |
| 1000 | 59.87 ± 23.98 | 138.38 ± 28.54 | 51.89 ± 51.89 |
Although individual averaged points were often grouped near one another, there was still differences in the position. This becomes even more apparent when you look at the shots graphically displayed.

Unsurprisingly, as the base receives no outside corrections, there is an offset in the calculated position. As a result, if you were to take the rover to other local points, or other post processed points that you know the coordinates of, we would expect to see an error of around 150 cm in the Easting and 50 cm in the Northing.
Our graphic also highlights one of the other drawbacks of the average point setup. The local control points may not be referenced to the GNSS coordinates, or may have moved over time in relation to the true GNSS position.
A few factors influence exactly what position your receiver lands on during averaging:
This is the core reason averaging more observations does not necessarily eliminate absolute position bias. Averaging reduces noise, the random scatter between individual readings, but it does nothing to correct systematic error, the consistent, direction-biased offset baked into standalone GNSS positioning. No matter how many points you average, if the underlying bias is systematic rather than random, your average will simply converge on an offset position instead of the true one.
Despite everything I have just laid out, for most surveyors, the average position setup is the setup I will recommend when setting their equipment up. Although for many surveyors getting started with GNSS who are coming from total stations the known point method feels familiar and “more correct.” There are a couple of big advantages to going with an average position setup.
1. More Flexibility in Base Placement
With average positioning, you can place the base wherever conditions are best—away from trees, power lines, or buildings. That’s crucial for reliable signal quality and data transmission. Many older control points that were placed with optical instruments were placed in protected areas, generally without consideration for GNSS receivers. For instance, the monument closest to our office here was set underneath a powerline, and next to a chain link fence. Both of which will limit GNSS signals.
2. Preserve Control Points for Rover Use
If you set your base over a known control point, that’s one less you can tag or check with your rover. For example, if you only have three control points and use one for your base, you’re left with just two to work with. If the point under your base is bad or entered incorrectly? You’ll have to completely set your equipment up again. But with an average setup, you can disable and reenable all control points to find which point is the source of any error.
As I have alluded above, you can perform a localization to correct for this error. Localizations correct for any bias in the base setup. By tagging known control points with your rover, you adjust the entire survey to fit real-world coordinates. The average position error becomes a non-issue.
Although I generally recommend the average point setup, there are scenarios when it does not make sense. As the average point setup introduces a bias in the data. As the above data has shown, that bias is not consistent from setup to setup. That means if you need your data to line up day to day without doing a localization after every setup, you cannot use an average position setup every time.
Day 2 is when the known position setup is recommended. By setting your base over the same point, and using the same coordinates as before, you will see your data line up day to day.
Before you start collecting data, run through this list to make sure your setup is solid:
An RTK base station occupies a fixed position, either known or averaged, and observes satellite signals from that spot. It then broadcasts correction data in real time to your rover, allowing the rover to correct for atmospheric interference, clock drift, and other GNSS errors.
Most single-day surveys are well served by an average position setup, since it offers more flexibility in base placement and preserves control points for the rover. A known position setup is the better choice when your data needs to line up consistently across multiple days without performing a localization each time.
Longer averaging sessions can tighten the scatter between individual readings, but our testing showed that increasing observations from 300 to 1,000 didn’t reliably reduce the overall position error, since much of that error is systematic rather than random.
If the base shifts during a survey, every rover measurement taken afterward will be offset by the same amount. This is why tripod stability and firm ground placement are critical, and why it’s worth checking a known point periodically to catch any movement early.
Check that your rover is showing a FIX status, then take a measurement on a known point or previously surveyed location and compare it to the expected coordinates. Consistent results confirm your base and coordinate system are set up correctly.
Yes, and doing so is exactly how a known position setup keeps your data aligned day to day. As long as you set up over the same physical point and enter the same coordinates, your survey data will remain consistent across sessions without needing a fresh localization.
If you always use the same setup method, your data will align consistently. But by starting with an average setup, you gain flexibility, preserve control points, and avoid setup issues. It’s the smarter way to work in the field.
Need more guidance? Visit Survey-Assistant.com for how-to videos, tips, and detailed walkthroughs.
Questions? Call us anytime.
